When Disaster Strikes
Things don't always go as planned in the soap studio. As we've grown our business and developed new recipes, we've learned an awful a lot about what NOT to do when making soap. Today, we'll explain some common mistakes in soap making and how to avoid them.
Premature Unmolding
Perhaps the most frustrating mistake we've made is unfolding too early. This is especially aggravating because it's 100% user error! There have been many times when we're so excited to see how a soap has turned out that we force it out of the mold too early, resulting in a soft, crumbly mess. Luckily, we've been able to save at least a few bars out of each prematurely-unmolded batch, so they haven't been *total* losses, but it's still disappointing when you work to create a beautiful loaf and then ruin it at the last second. Ugh!
To avoid this, we've learned to always, always, always wait at least 24 hours after pouring to unmold. Sometimes, if a soap still feels a little soft, we'll give it even longer. That way, the soap is able to sit undisturbed long enough to really harden before you pry it out of the mold. If you wait long enough, you can avoid any small dents or fingerprints that are so easy to leave on a soft loaf. Another option is to add a couple teaspoons of sodium lactate to your batch. We love using sodium lactate because it helps the soap get harder faster, which is good for both unmolding and the lifespan of each bar of soap.
Here are some examples of what your soap will look like if you're impatient:
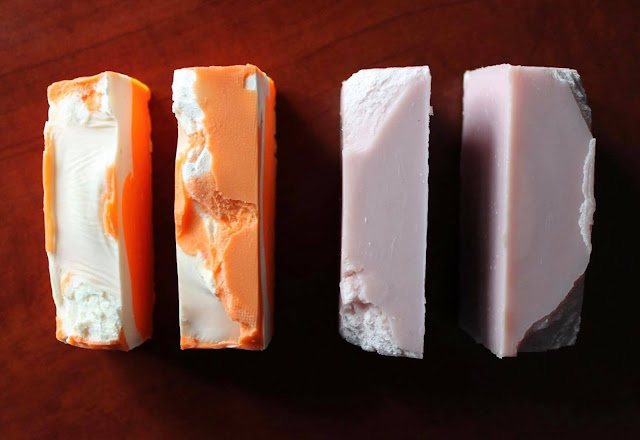


The soap is still perfectly fine to use, it just doesn't look as pretty!
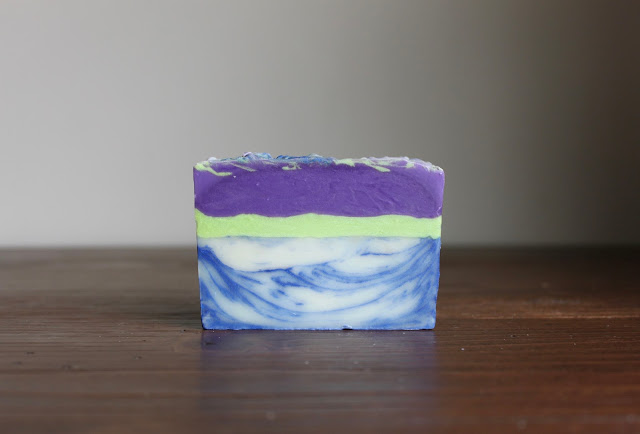
Drag Marks
Many of our soaps have salt or other decorations on top for added skin benefits or decoration. The first few loaves we made with this were real learning experiences. Usually, when you cut a loaf of soap, you simply set the loaf upright on the cutter, and you're good to go. When you have salt on top, though, you run the risk of dragging the additives from the top down if you cut the normal way. This can give soap a more "rustic" look, which many people love, but sometimes it just makes a bar look a little to rough for our tastes.
To avoid this, we decided to try cutting the loaves on their side or upside-down. It worked! Now, when we cut, the additives won't get dragged down through the soap since we're cutting from the bottom up.
This is from one of our first loaves of The Morning Mist before we learned how to cut it:

Seizing
This is the most perplexing problem we've come to face. We're still not sure exactly what caused it! Seizing occurs when saponification begins before you even have time to pour the soap in the mold. Sometimes you can have a light seize, where the soap thickens up so you have to quickly finish up what you're doing and get it in the mold, but other times your soap can go into full-blown seizure.
We recently had a full-blown seizure. It was the first time we were using castor oil. All we wanted was some extra bubbles for our shampoo bars! But the addition of castor oil caused the soap to harden in the bowl, which led to us scooping it into the mold spoonful-by-spoonful. That meant it sure wasn't going to look pretty once it was unmolded!
There are lots of different causes to seizing. Sometimes, a certain fragrance oil that can cause the soap to thicken. This wasn't the case for us because we'd used the oil before with no issues. Another cause can be the temperature. Soaping at hotter temperatures can cause soap to thicken more quickly.
Here's what a seizing mixture can end up looking after unmolding:

It still smells and works great, but it's definitely not very good-looking. This product is still in development!
Soap making can be very tricky! Even the slightest change in recipe, temperature, or additive can cause a mixture to behave completely differently than it has before. While it can be really frustrating to figure out what happened, it's always fun to see how different problems affect the soap, and it always leads to more learning opportunities!
Soaps that didn't misbehave can be purchased here.
AK
Comments
Post a Comment